Friday, July 17, 2009

AutoCAD Civil 3D ActiveX object model Part 3

In Parts 1 and 2 I introduced the concept of accessing the AutoCAD object model using Visual LISP. This is just a brief post on more of the resources and steps you need to use to customize Civil 3D.

In the Civil 3D Help folder, there is an extensive help file called civil_api_activex_reference.chm that documents the ActiveX model.

If you want to find out whether a feature line is added to a surface as a breakline, you can use something like this code in AutoCAD Civil 2010:


(vlax-dump-object
(vlax-safearray-get-element
(VLAX-variant-value
(vlax-get-property
(vlax-invoke
(vlax-get-property
(vlax-get-property
(vlax-get-property
(vlax-get-property
(vla-getinterfaceobject
(VLAX-GET-ACAD-OBJECT)
"AeccXUiLand.AeccApplication.7.0"
)
'ActiveDocument
)
'Surfaces
)
'Item
2
)
'Breaklines
)
'Item
0
)
'BreaklineEntities
)
)
2
)
T
)


The code above shows (dumps) the third (2) AutoCAD object in the first (0) breakline group in the third (2) surface of the active drawing. To find a particular AutoCAD object, you would have to loop through all the objects in all the Breaklines Sets in all the surfaces of the active drawing.

I believe, but I'm not sure, that to remove a single feature line from a surface, you would have to remove its entire breakline set, and then add again all the other feature lines in its set (which would bring up the issue of preserving original supplementing and mid-ordinate distances).

Civil 3D Surface Spot Elevation Short Leader Arrow Heads and Markers

One way to label spot elevations on a Civil 3D a grading plan like we do at Hubbard Engineering is to use Surface Spot Elevation labeling (Surfaces, Add Surface Labels, Spot Elevations). You can define styles so your spot elevations look like this:


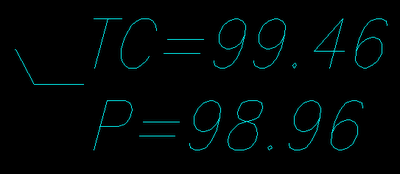
But very often on a grading plan you need to economize space, so you need to make your leader rather short. You don't want the arrow head (marker) to disappear like this:


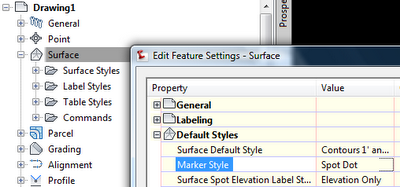
But whether we can see it or not, there is a marker at the end of the leader above. In this case, it's far too small. In your case, it may be the wrong marker. Where is that controlled? On insertion, it's controlled in the Toolspace Settings tab under Surface, Edit Feature Settings, Default Styles, Marker Style. The screen shot below shows that we are using Spot Dot as the default surface marker at Hubbard Engineering. Note, however, that this setting does not change any labels that have already been inserted. If you have the wrong marker style for those, you need to change it using Properties.


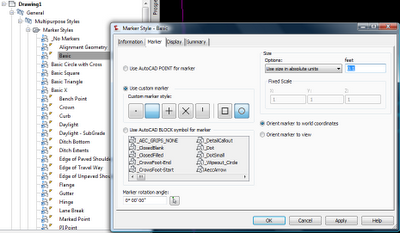
But the size of the Spot Dot is too small for our needs. So we go to Toolspace, Settings, General, Multipurpose Styles, Marker Styles, and we edit the marker style in question. In the screen shot below, the size of Basic marker style is being changed. In my case, I needed to increase the size of the Spot Dot marker style


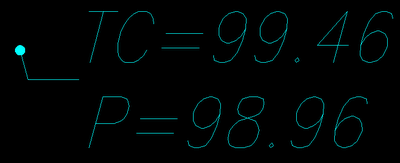
After I increased the size of the Spot Dot marker style, I can make my Spot Elevation leader short without losing the dot. Whew!

Wednesday, July 8, 2009

Civil 3D Mid-ordinate Distance Part 2--Changing Default

In Part 1 I explained why you may need to use a smaller mid-ordinate distance when you Add Feature Lines as Breaklines to a surface. You may want to change the Civil 3D default mid-ordinate distance. The image below shows how you can change the default distance in AutoCAD Civil 3D 2010 using the Toolspace (ShowTS command)


I hope that's helpful.

Tom Haws
Hubbard Engineering

Tuesday, July 7, 2009

Civil 3D feature line offset and mid-ordinate distance

Civil 3D Rule: When adding Feature lines as breaklines to a surface, use a "mid-ordinate distance" smaller than your smallest arc offset.

Louisa Holland blogged about "Why does it seem like Civil 3D is ignoring parts of my breaklines?" I might add:

Why does the Civil 3D Event viewer keep telling me a feature line "Breakline not added...crossed a breakline at...."? I can plainly see the breakline does not cross any other breakline. Is there a phantom line? Is Civil 3D having an error? Do I need to audit my drawing? No.

Civil 3D Rule: When adding Feature lines as breaklines to a surface, use a "mid-ordinate distance" smaller than your smallest arc offset.


This was happening to me, and as Louisa's blog hints, the problem I experienced was that I was offsetting feature lines (for the MAG/Arizona curb faces we do at Hubbard Engineering) 1 inch horizontally. But my "mid-ordinate distance" in adding the feature lines as breaklines to my surface was 1.00' (12 inches). This meant that eventually two adjacent arcs were going to get segmented (tessellated is the technical term) in a way that made them cross each other.

Civil 3D has to break arcs into segments to use them for surfaces. This of course introduces an error. The maximum error distance is called in Civil 3D the "mid-ordinate distance". If you let the mid-ordinate distance be greater than the offset distance between two arcs, their segments (tessellations) may (will eventually) cross. The solution is to set the mid-ordinate distance no greater than the closest distance between adjacent arcs.

Of course you may want to also change the default value. You can do this in AutoCAD 2010 as E. Chappell showed me. See Part 2.

Monday, July 6, 2009

AutoCAD and Python Part 2

In Part 1 I talked about my search to replace AutoLISP with another customization method. Today I am sharing my success controlling AutoCAD (which I have been using for fifteen years) with Python (which I have never used).

Obviously I have AutoCAD running. So the next item of business was to install Python. I got the ActivePython installation package from ActiveState and installed it. Then I got the win32all package from Sourceforge. I downloaded it in zip file format, extracted the zip file, and double-clicked first on setup.py, then on pywin32_postinstall.py. I was just guessing, so I dont' know if the second one was necessary. Then I opened the Python Interactive Shell from the Windows Start Programs menu and pasted the Tim Riley snippet on my Part 1 post line by line into the shell. What do you know if it didn't actually echo "Hello from Python" to my AutoCAD Civil 3D command line!


import win32com.client
acad = win32com.client.Dispatch("AutoCAD.Application")
doc = acad.ActiveDocument
doc.Utility.Prompt("Hello from Python\n")


Now let's try combining that with some of the experimentation I tried at my Accessing the AutoCAD Object Model post. Let's go back to that Python Interactive shell.


doc.ModelSpace.AddCircle


Nope. It's an error. And I can't find the solution today.  Please leave a comment if you know how to get further than this in AutoCAD with Python.  I am very interested.

An experiment in object-oriented AutoLISP

It has taken me a while to grok object oriented programming. But having sort of groked it, I kind of would like to be able to do a little bit of it with my old friend, AutoLISP (or Visual LISP). Why would I want to do that? Well, suppose you want to write a function to make pancakes, and one morning you decide to make blueberry oatmeal pancakes in the shape of your kids' initials. Without object oriented programming, you might make the pancakes like this:


(make-pancake (list "blueberry" "oatmeal" "brown sugar") "Sally")
(make-pancake (list "blueberry" "oatmeal" "brown sugar") "Billy")
(make-pancake (list "blueberry" "oatmeal" "brown sugar") "Joey")
(make-pancake (list "blueberry" "oatmeal" "brown sugar") "Elizabeth")
(make-pancake (list "blueberry" "oatmeal" "brown sugar") "Marci")


That seems repetitive.

Another way you might do it is to use a global (external) variable for ingredient values inside the function. Then you might make the pancakes like this:


(setq ingredients (list "blueberry" "oatmeal" "brown sugar"))
(make-pancake "Sally")
(make-pancake "Billy")
(make-pancake "Joey")
(make-pancake "Elizabeth")
(make-pancake "Marci")


That seems less than elegant. What if you want to vary the ingredients, not the kids' names. I guess you could make all the variables in (make-pancake) global. But then you have to remember to make them local in the function that calls them, or leave them totally global and exposed to conflict with other applications.

Then (tada!) there is the object oriented way, or at least my OO-ish hack in AutoLISP. Consider this just an idea. Take it for what it's worth. Working example to follow.


(new-PancakeMaker 'PMTuesday)
(put-property 'PMTuesday "INGREDIENTS" (list "blueberry" "oatmeal" "brown sugar"))
(put-property 'PMTuesday "NAME" "Sally")
(PancakeMaker-make-pancake)
(put-property 'PMTuesday "NAME" "Billy")
(PancakeMaker-make-pancake 'PMTuesday)
(put-property 'PMTuesday "NAME" "Joey")
(PancakeMaker-make-pancake 'PMTuesday)
(put-property 'PMTuesday "NAME" "Elizabeth")
(PancakeMaker-make-pancake 'PMTuesday)
(put-property 'PMTuesday "NAME" "Marci")
(PancakeMaker-make-pancake 'PMTuesday)


Here is a working example. This example installs (copies) files:


;;;First the functions
;;; A small experiment in object oriented AutoLISP

(DEFUN
NEW-INSTALLER (OBJECTNAME)
(SET
OBJECTNAME
'(("SOURCEPATH") ("INSTALLPATH") ("NFAILURES" . 0))
)
)
(DEFUN
PUT-PROPERTY (OBJECT PROPERTY VALUE)
(SET
OBJECT
(SUBST
(CONS PROPERTY VALUE)
(ASSOC PROPERTY (EVAL OBJECT))
(EVAL OBJECT)
)
)
)
(DEFUN
GET-PROPERTY (OBJECT PROPERTY)
(CDR (ASSOC PROPERTY (EVAL OBJECT)))
)
(DEFUN
INSTALLER-INSTALL (OBJECT FILEPATH / SOURCE DESTINATION)
(SETQ
SOURCE
(STRCAT (GET-PROPERTY OBJECT "SOURCEPATH") FILEPATH)
DESTINATION
(STRCAT (GET-PROPERTY OBJECT "INSTALLPATH") FILEPATH)
)
(IF (FINDFILE DESTINATION)
(VL-FILE-DELETE DESTINATION)
)
(IF (NOT (VL-FILE-COPY SOURCE DESTINATION))
(PUT-PROPERTY
OBJECT
"NFAILURES"
(1+ (GET-PROPERTY OBJECT "NFAILURES"))
)
)
)
;;;Second the usage
(NEW-INSTALLER 'KIPINSTALL)
(PUT-PROPERTY
'KIPINSTALL
"SOURCEPATH"
"R:\\Updates & Installs\\KIP\\HDI 2010\\"
)
(PUT-PROPERTY
'KIPINSTALL
"INSTALLPATH"
(STRCAT (VLA-GET-PATH (ACAD-OBJECT)) "\\")
)
(FOREACH
FILEPATH
'(
"drv\\kip_kawpdft.exe"
"drv\\kip_kipzip.exe"
"drv\\kip10res.dll"
"drv\\polarziplight.dll"
"drv\\kip10.hdi"
"drv\\kip10.drc"
"Help\\drv_kip.chm"
)
(INSTALLER-INSTALL 'KIPINSTALL FILEPATH)
)
)
)
(COND
(> (GET-PROPERTY 'KIPINSTALL "NFAILURES") 0)
(ALERT
(PRINC
(STRCAT
"There was a failure in installing the kip drivers from\nR:\\Updates & Installs\\KIP\\HDI 2010"
)
)
)
)


I'd love to see some improvements on this. Let me know what you can do.

Accessing the AutoCAD Civil 3D Object Model with AutoLISP

I was grubbing around today for my cheat sheet on talking to the AutoCAD Civil object model using AutoLISP, and I found out it isn't that easy to find. So, time for a post. I remember I got my first hint at the Ontario Civil 3D blog, where it talks about accessing the model with Visual Basic. And doing the same with AutoLISP is almost the same process.

First, you have to understand that accessing the model is largely a matter of drilling down into the model tree until you find what you want. It may take some guess-work, but it isn't all that hard. Here. I'll show you what I mean.

First start the Visual LISP editor using the VLISP command. Then paste either or both of the following bits of code into the Visual LISP Console window:

Snippet 1 (AutoCAD)

(SETQ ACADAPP (VLAX-GET-ACAD-OBJECT))
(VLAX-DUMP-OBJECT (VLAX-GET-PROPERTY ACADAPP
'PREFERENCES) T)


Snippet 2 (AutoCAD Civil 2010)

(setq aeccapp (vla-getinterfaceobject ACADAPP "AeccXUiLand.AeccApplication.7.0"))
(VLAX-DUMP-OBJECT AECCAPP T)


I got the following output when I pasted both:


#
; IAcadPreferences: This object specifies the current AutoCAD settings
; Property values:
; Application (RO) = #
; Display (RO) = #
; Drafting (RO) = #
; Files (RO) = #
; OpenSave (RO) = #
; Output (RO) = #
; Profiles (RO) = #
; Selection (RO) = #
; System (RO) = #
; User (RO) = #
; No methods
T
#
; IAeccApplication: interface IAeccApplication
; Property values:
; ActiveDocument = #
; Application (RO) = #
; Caption (RO) = "AutoCAD Civil 2010 - [turntest.dwg]"
; Documents (RO) = #
; FullName (RO) = "C:\\Program Files (x86)\\AutoCAD Civil 2010\\acad.exe"
; Height = 1036
; HWND (RO) = 1903218
; LocaleId (RO) = 1033
; MenuBar (RO) = #
; MenuGroups (RO) = #
; Name (RO) = "AutoCAD Civil 2010"
; Path (RO) = "C:\\Program Files (x86)\\AutoCAD Civil 2010"
; Preferences (RO) = #
; StatusId (RO) = ...Indexed contents not shown...
; VBE (RO) = #
; Version (RO) = "18.0s (LMS Tech)"
; Visible = -1
; Width = 1696
; WindowLeft = -8
; WindowState = 3
; WindowTop = -8
; Methods supported:
; Eval (1)
; GetAcadState ()
; GetInterfaceObject (1)
; Init (1)
; ListArx ()
; LoadArx (1)
; LoadDVB (1)
; Quit ()
; RunMacro (1)
; UnloadArx (1)
; UnloadDVB (1)
; Update ()
; ZoomAll ()
; ZoomCenter (2)
; ZoomExtents ()
; ZoomPickWindow ()
; ZoomPrevious ()
; ZoomScaled (2)
; ZoomWindow (2)
T


AutoCAD dumped for me the Preferences collection of the AutoCAD (IAcadApplication) object model, then the top level of the AutoCAD Civil (IAeccApplication) object model.

With the dump lists, I can either use/invoke/run one of the listed methods (guessing or researching or relying on error messages to guide me) or explore further into one of the properties. Let's see what we can find in the Civil active document.


(VLAX-DUMP-OBJECT (vlax-get-property AECCAPP
'ActiveDocument) T)


Wow! That worked and I got another long list. Let's try it again.


(VLAX-DUMP-OBJECT (vlax-get-property
(vlax-get-property AECCAPP 'ActiveDocument) 'ModelSpace) T)


Okay. Now I see a method called AddCircle. Let's try it out.

(VLAX-DUMP-OBJECT (vla-AddCircle
(vlax-get-property (vlax-get-property AECCAPP 'ActiveDocument) 'ModelSpace) '(0 0 0) 1) T)


Hmm. An error.


; error: lisp value has no coercion to VARIANT with this type: (0 0 0)


We probably have to turn the LISP point into a VB type point. *read help*
Okay. I found something. Let's try this: (vlax-3D-point list) or (vlax-3D-point x y [z])

(VLAX-DUMP-OBJECT (vla-AddCircle (vlax-get-property (vlax-get-property AECCAPP 'ActiveDocument) 'ModelSpace) (vlax-3D-point 0 0 0) 1) T)


Whoa! It drew a circle. Not bad.

So, even though the ModelSpace property of the ActiveDocument was read only (RO), there were things we could do inside it. Lots of things! The rest is all exploration and experimentation with the help file. Now to do the same thing with Python. I better go check my Python install download.